테라폼에 대해서 공부하다가 어느정도 블록에 대한 이해가 돼서 바로 테라폼으로 aws의 자원을 프로비저닝을 해보려한다.
프로비저닝 목록
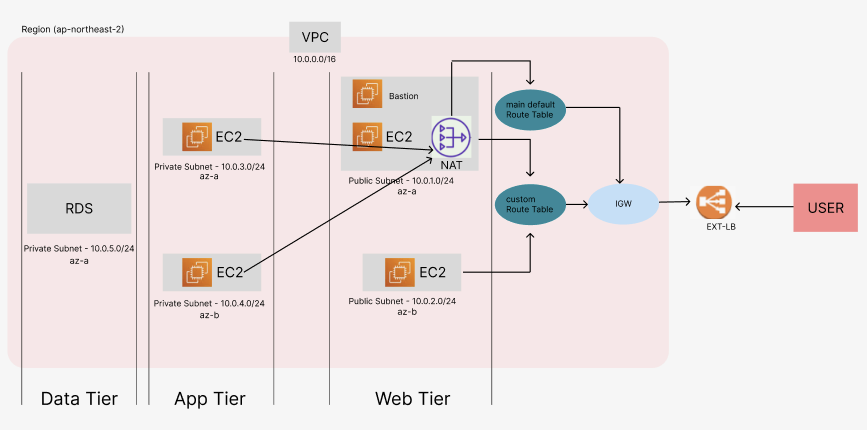
1. VPC(10.0.0.0/16), 디폴트 라우트 테이블, 커스텀 라우트 테이블 프로비저닝
2. 인터넷 게이트웨이 프로비저닝
3. NAT 게이트웨이 프로비저닝
4. 시큐리티 그룹 프로비저닝
5. AZ-a의 Public Subnet(10.0.1.0/24), Private Subnet(10.0.3.0/24, 10.0.5.0/24) 프로비저닝
6. AZ-b의 Public Subnet(10.0.2.0/24), Private Subnet(10.0.4.0/24) 프로비저닝
7. bastion(점프 서버, RDS와 앱서버 접속을 위함) 프로비저닝
8. 웹 티어 ec2 두 개 서브넷 별로 프로비저닝
9. 앱 티어 ec2 두 개 서브넷 별로 프로비저닝
10. RDS 프라이빗 서브넷에 프로비저닝
11. ALB 프로비저닝 후 웹 티어 EC2 두 개를 타겟 그룹으로 지정
1번부터 11번까지 프로비저닝 하기위한 terraform 코드를 보여주겠다.
우선 프로바이더 지정을 한다.
provider.tf
provider "aws" {
  access_key = "사용자 액세스키"
  secret_key = "사용자 시크릿키"
  region = "ap-northeast-2"
}
그리고 자동화할 키워드를 변수처리 한다.
variables.tf
variable "cidr_public" {
  type = list
  default = ["10.0.1.0/24","10.0.2.0/24"]
}

variable "cidr_private" {
  type = list
  default = ["10.0.3.0/24","10.0.4.0/24","10.0.5.0/24"]
}

variable "az" {
  type = list
  default = ["ap-northeast-2a","ap-northeast-2b","ap-northeast-2a"]
}
이제 vpc를 프로비저닝 한다.
vpc.tf
resource "aws_vpc" "main" {
  cidr_block = "10.0.0.0/16"

  tags = {
    Name = "3_tier_VPC"
  }
}
이제 서브넷을 프로비저닝 한다.
subnet.tf
resource "aws_subnet" "public" {
  vpc_id     = aws_vpc.main.id
  cidr_block = var.cidr_public[count.index]
  availability_zone = var.az[count.index]
  count = 2

  tags = {
    Name = "public-sub"
  }
}

resource "aws_subnet" "private" {
  vpc_id     = aws_vpc.main.id
  cidr_block = var.cidr_private[count.index]
  availability_zone = var.az[count.index]
  count = 3

  tags = {
    Name = "private-sub-${count.index}"
  }
}
라우트 테이블을 프로비저닝 한다.
route_tb.tf
resource "aws_route_table" "rtb" {
  vpc_id = aws_vpc.main.id

  route {
    cidr_block = "0.0.0.0/0"
    gateway_id = aws_internet_gateway.gw.id
  }

  tags = {
    Name = "IGWRoute"
  }
}

resource "aws_route_table_association" "a" {
  subnet_id      = aws_subnet.public[count.index].id
  route_table_id = aws_route_table.rtb.id
  count = 2
}

resource "aws_default_route_table" "dfltrtb" {
  default_route_table_id = aws_vpc.main.default_route_table_id

  route {
    cidr_block = "0.0.0.0/0"
    gateway_id = aws_nat_gateway.natgw.id
  }

  tags = {
    Name = "dfltrtb"
  }
}
NAT 게이트웨이를 프로비저닝 한다.
natgw.tf
resource "aws_eip" "myeip" {
  //instance = aws_instance.web.id
  vpc      = true
}

resource "aws_nat_gateway" "natgw" {
  allocation_id = aws_eip.myeip.id
  subnet_id     = aws_subnet.public[0].id

  tags = {
    Name = "gw NAT"
  }

  # To ensure proper ordering, it is recommended to add an explicit dependency
  # on the Internet Gateway for the VPC.
  depends_on = [aws_internet_gateway.gw]
}
인터넷 게이트웨이를 프로비저닝 한다.
igw.tf
resource "aws_internet_gateway" "gw" {
  vpc_id = aws_vpc.main.id

  tags = {
    Name = "main"
  }
}
ec2를 프로비저닝 한다.
ec2.tf
data "aws_key_pair" "TF_admin" {
  key_name = "TF_admin"
}

resource "aws_instance" "bastion" {
  ami           = "ami-04c596dcf23eb98d8"
  instance_type = "t3.nano"
  key_name = data.aws_key_pair.TF_admin.key_name
  subnet_id = aws_subnet.public[0].id
  vpc_security_group_ids = [aws_security_group.allow_tls.id]
  associate_public_ip_address = true

  tags = {
    Name = "Bastion"
  }
}


resource "aws_instance" "web" {
  ami           = "ami-04c596dcf23eb98d8"
  instance_type = "t3.nano"
  key_name = data.aws_key_pair.TF_admin.key_name
  subnet_id = aws_subnet.public[count.index].id
  vpc_security_group_ids = [aws_security_group.allow_tls.id]
  associate_public_ip_address = true
  count = 2
  user_data = <<-EOF
#!/bin/bash
yum -y update
yum install -y httpd
echo "Hello, 3_tier Web Site!!" > /var/www/html/index.html
systemctl start httpd
systemctl enable httpd
EOF

  tags = {
    Name = "WebServer-${count.index}"
  }
}

resource "aws_instance" "app" {
  ami           = "ami-04c596dcf23eb98d8"
  instance_type = "t3.nano"
  key_name = data.aws_key_pair.TF_admin.key_name
  subnet_id = aws_subnet.private[count.index].id
  vpc_security_group_ids = [aws_security_group.allow_app.id]
  count = 2

  tags = {
    Name = "APPServer-${count.index}"
  }
}
RDS를 프로비저닝 한다.
rds.tf
#rds.tf

#rds의 서브넷 그룹으로 사용할 subnet들 미리 지정
resource "aws_db_subnet_group" "default" {
  name = "main"
  subnet_ids = [
    aws_subnet.private[0].id,
    aws_subnet.private[1].id
  ]
  tags = {
    "Name" = "db-subnet-group"
  }
}

resource "aws_db_instance" "real_rds" {
    allocated_storage = 20
    max_allocated_storage = 40
    skip_final_snapshot = true
    engine = "MySQL"
    engine_version = "8.0.35"
    instance_class = "db.m5.large"
    db_name = "TF_DB"
    username = "admin"
    password = "admin123"
    multi_az = false
 #   db_subnet_group_name = aws_db_subnet_group.default.name
    tags = {
        "Name" = "TF_DB"
    }
}
alb를 프로비저닝 한다.
alb.tf
resource "aws_lb" "alb" {
  name               = "test-lb-tf"
  internal           = false
  load_balancer_type = "application"
  security_groups    = [aws_security_group.allow_tls.id]
  subnets            = [for subnet in aws_subnet.public : subnet.id]

  enable_deletion_protection = false

  tags = {
    Name = "alb_TF"
  }
}

//Target Group
resource "aws_lb_target_group" "albtg" {
  name     = "tf-example-lb-tg"
  port     = 80
  protocol = "HTTP"
  target_type = "instance"
  vpc_id   = aws_vpc.main.id

  health_check {
    healthy_threshold   = 3
    unhealthy_threshold = 10
    timeout             = 5
    interval            = 10
    path                = "/"
    port                = 80
  }
}

resource "aws_lb_target_group_attachment" "front_end" {
  target_group_arn = aws_lb_target_group.albtg.arn
  target_id        = aws_instance.web[count.index].id
  port             = 80
  count = 2
}

//Listener
resource "aws_lb_listener" "albl" {
  load_balancer_arn = aws_lb.alb.arn
  port              = "80"
  protocol          = "HTTP"

  default_action {
    type             = "forward"
    target_group_arn = aws_lb_target_group.albtg.arn
  }
}
이렇게 구성 파일들을 모아놓으면 총 11개의 tf파일이 모여야 한다.

terraform apply 명령으로 프로비저닝을 하고 결과를 보자.